
Monday, June 9, 2014
Wednesday, April 23, 2014
เริ่มเล่น Raspbery Pi สักที ลืมหมดล่ะ
--------------------------------
Raspberry Pi Default account
User : pi
Password : raspberry
--------------------------------
Wifi Basic command
--------------------------------
Check wifi connected
- iwcongi
--------------------------------
Check if each network interface
- ifconfig
--------------------------------
WiFi Scanning
- iwlist wlan0 scanning
--------------------------------
Setting Wifi Connect to router WPA Security (Not work with WPA2)
Setting by DHCP
1. Command to edit network interface file
>sudo nano /etc/network/interfaces
auto lo
iface lo inet loopback
iface eth0 inet dhcp
allow-hotplug wlan0
auto wlan0
iface wlan0 inet dhcp
wpa-ssid "YOUR_SSID"
wpa-psk "YOUR_PASSPHRASE"
Setting by Static IP
1. Command to edit network interface file
>sudo nano /etc/network/interfaces
auto lo
iface lo inet loopback
iface eth0 inet dhcp
allow-hotplug wlan0
auto wlan0
iface wlan0 inet static
address 192.168.0.6
netmask 255.255.255.0
gateway 192.168.0.1
wpa-ssid "YOUR_SSID"
wpa-psk "YOUR_PASSPHRASE"
Reference my tutorial
1. Download image for SD card
http://www.engadget.com/2012/09/04/raspberry-pi-getting-started-guide-how-to/
2. Wifi Connect
2.1auto dhcp
http://www.maketecheasier.com/setup-wifi-on-raspberry-pi/
http://pingbin.com/2012/12/setup-wifi-raspberry-pi/
2.2 Static IP
http://docs.brewpi.com/installing-your-pi/rpi-setup.html
https://learn.adafruit.com/adafruits-raspberry-pi-lesson-3-network-setup/setting-up-wifi-with-occidentalis
Wednesday, September 25, 2013
Test MR3020 with Arduino Uno
Comouter -----usb----> arduino --------->FT232RL----->USBHUB-------->MR3020
i test serial port via usb2serial converter with mr3020
driver usb to serial i install
this source code on mr3020 run with shell script and arduino board run with softwareserial
http://forum.arduino.cc/index.php/topic,39485.0.html
http://arduino.cc/en/Reference/SoftwareSerial
i test serial port via usb2serial converter with mr3020
driver usb to serial i install
opkg update
opkg install kmod-usb-serial
opkg install kmod-usb-serial-ftdi
Refference:
http://smartcity.cs.columbia.edu/openwrt/openwrt_packages.php
this source code on mr3020 run with shell script and arduino board run with softwareserial
http://forum.arduino.cc/index.php/topic,39485.0.html
http://arduino.cc/en/Reference/SoftwareSerial
Tuesday, September 24, 2013
Test Livestream webcam on MR3020 with OpenWRT
On this test i'm install OpenWRT firmware via TP-Link web update.
firmware from http://wiki.openwrt.org/toh/tp-link/tl-mr3020
this test i don't break cover on rounter and so i connect rouner via Lan cable by "telnet 192.168.1.1"
and internet i connect via myhome wifi on web GUI like below figure

then on console i can connect to internet.
in tutorial in follow by
http://www.ediy.com.my/index.php/blog/item/80-tp-link-tl-mr3020-%20-openwrt-%20-webcam
http://www.ediy.com.my/index.php/blog/item/33-tp-link-tl-wr1043nd-router-%20-web-cam-=-ip-cam
http://forums.ninjablocks.com/index.php?p=/discussion/251/fixed-webcam-issue-mjpg-streamer-unable-to-set-format-1196444237-res-640x480/p1
and this my succeed command....
root@OpenWrt:/# mjpg_streamer -i "/usr/local/lib/input_uvc.so -y -d /dev/video0
-f 10 -r 320x240" -o "/usr/local/lib/output_http.so -p 8080 -w /www/webcam"
above i can stream at only 5frame per sec
i decrease quality of image and then i can stream at 10fream per sec
mjpg_streamer -i "/usr/local/lib/input_uvc.so -y -d /dev/video0 -q 50 -f 10 -r 320x240" -o "/usr/local/lib/output_http.so -p 8080 -w /www/webcam"
but the last perferman banwidth of webcam can only stream average at 7-8fps

if you want run on background mode. there are parameter like this
mjpg_streamer
-i | input " [parameters]"
-o | output " [parameters]"
[-h | help ]........: display this help
[-v | version ].....: display version information
[-b | background]...: fork to the background, daemon mode
Note: If you start mjpg-streamer in the background use this to stop it:
kill -9 `pidof mjpg_streamer`
Next step
boot at start
https://forum.openwrt.org/viewtopic.php?id=28661
read on it.
http://sourceforge.net/p/mjpg-streamer/discussion/739917/thread/595fe908
http://wolfpaulus.com/jounal/embedded/raspberrypi_webcam
Guild
http://store.jpgottech.com/support/tp-link-mr3020-openwrt-flashing-guide/
Nextstep - usb2serial with usbport
https://forum.openwrt.org/viewtopic.php?id=18786
http://www.dd-wrt.com/phpBB2/viewtopic.php?p=695737
http://smartcity.cs.columbia.edu/openwrt/openwrt_packages.php
http://www.kelvinsthunderstorm.com/omnimaopenwrt-and-xbee/
https://forum.openwrt.org/viewtopic.php?id=40841
firmware from http://wiki.openwrt.org/toh/tp-link/tl-mr3020
this test i don't break cover on rounter and so i connect rouner via Lan cable by "telnet 192.168.1.1"
and internet i connect via myhome wifi on web GUI like below figure

then on console i can connect to internet.
in tutorial in follow by
http://www.ediy.com.my/index.php/blog/item/80-tp-link-tl-mr3020-%20-openwrt-%20-webcam
http://www.ediy.com.my/index.php/blog/item/33-tp-link-tl-wr1043nd-router-%20-web-cam-=-ip-cam
http://forums.ninjablocks.com/index.php?p=/discussion/251/fixed-webcam-issue-mjpg-streamer-unable-to-set-format-1196444237-res-640x480/p1
and this my succeed command....
root@OpenWrt:/# mjpg_streamer -i "/usr/local/lib/input_uvc.so -y -d /dev/video0
-f 10 -r 320x240" -o "/usr/local/lib/output_http.so -p 8080 -w /www/webcam"
above i can stream at only 5frame per sec
i decrease quality of image and then i can stream at 10fream per sec
mjpg_streamer -i "/usr/local/lib/input_uvc.so -y -d /dev/video0 -q 50 -f 10 -r 320x240" -o "/usr/local/lib/output_http.so -p 8080 -w /www/webcam"
but the last perferman banwidth of webcam can only stream average at 7-8fps

if you want run on background mode. there are parameter like this
mjpg_streamer
-i | input "
-o | output "
[-h | help ]........: display this help
[-v | version ].....: display version information
[-b | background]...: fork to the background, daemon mode
Note: If you start mjpg-streamer in the background use this to stop it:
kill -9 `pidof mjpg_streamer`
Next step
boot at start
https://forum.openwrt.org/viewtopic.php?id=28661
read on it.
http://sourceforge.net/p/mjpg-streamer/discussion/739917/thread/595fe908
http://wolfpaulus.com/jounal/embedded/raspberrypi_webcam
Guild
http://store.jpgottech.com/support/tp-link-mr3020-openwrt-flashing-guide/
Nextstep - usb2serial with usbport
https://forum.openwrt.org/viewtopic.php?id=18786
http://www.dd-wrt.com/phpBB2/viewtopic.php?p=695737
http://smartcity.cs.columbia.edu/openwrt/openwrt_packages.php
http://www.kelvinsthunderstorm.com/omnimaopenwrt-and-xbee/
https://forum.openwrt.org/viewtopic.php?id=40841
Monday, September 16, 2013
Setting OpenCV with Visual Studio 2010 for window7 64bit (OpenCV2.4.6)
My resource.
1. OpenCV 2.6.4
2. Cmake 2.8.11.2
3. Visual Studio 2010
4. Windows 7 64bit
Refference
prepare program
Example code
Saturday, October 15, 2011
Using SyntaxHighlighter on your BLOGGER
1. Today I
don’t know how to use this script with the Dynamic view Blogger(new blogger
template).
2. In this article I use with Simple Template
Let’s go……
If someone
use Dynamic view , You must to change to simple or picture window if you are
ready you can follow me…….
1- Go
to your blog setting select “Template” and click Edit HTML same picture.

2- After that Click “Proceed”3- Finding Tag

4- After you meet this tag insert code follow picture

after insert you can check error by click Preview if every think OK, Click “Savetemplate” and click “Close” for close this diablo
5-Ok now your Blogger ready for use SyntaxHighlighter :D……Let’s go to use SyntaxHighlighter for your Article….
.
..
...
....
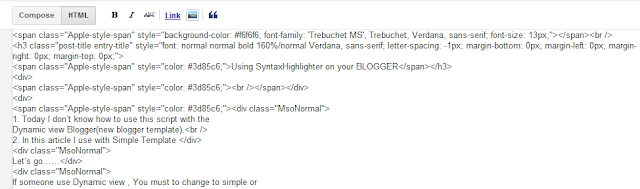
6- Create your new article or edit old you article , for normal you will stay in Composs mode if you want insert code you have to click “HTML” for insert code

after click HTML mode you will stay in HTML mode same under picture same under picture.

you have to insert tag “
……Your Code...
” Bold is language you will insert code . Now it’s
ready for insert your code. Test insert
code 
in picture I insert c-language code.
7- If you insert your code already click “Preview”.

If it’ not error you can see your code with your language style.

/*
 * ReadAnalogToSerial.c
 *
 * Created: 16/5/2554 11:01AM
 *  Author: Sathaporn C.
 */

#include <stdio.h>

int main (void)
{
    printf("Hello World");
    return(0);
}
Congratulation
for your try :D
Emmmmmm,,,,,,I
have another option for your confuse fot highlight your code you can go to http://quickhighlighter.com/ this
website and past your code and click “Highlight”
this website can generate Highlight for your code ezyyyyyyy

this website can generate Highlight for your code ezyyyyyyy


Credit:
http://phpdream.blogspot.com/2008/05/blogger-syntaxhighlighter.html
http://zobayer.blogspot.com/2010/01/syntaxhighlighter-for-blogger.html
http://developertips.blogspot.com/2007/08/syntaxhighlighter-on-blogger.html
http://symplik.blogspot.com/2010/06/add-syntax-highlight-in-google-sites.html
Saturday, January 22, 2011

Subscribe to:
Posts (Atom)